Как превратить статичные визуализации в ИИ-видеопрогулки
Узнайте, как с помощью ReRoom Видео превратить статичную архитектурную визуализацию в кинематографичную видеопрогулку с движением камеры, людьми и атмосферой.
Зачем превращать статичную визуализацию в видео?
В презентациях архитектурных и интерьерных проектов статичные визуализации по-прежнему остаются одним из самых распространенных способов подачи идеи. Они позволяют наглядно продемонстрировать материалы, освещение, композицию и атмосферу, но у них есть один существенный недостаток: зритель может оценить сцену только с одного ракурса.
В этом руководстве мы будем использовать ReRoom Видео, чтобы превратить готовую статичную визуализацию в кинематографичную видеопрогулку. Наша цель — не заменить полноценный процесс производства 3D-анимации, а помочь дизайнерам и архитекторам быстро создать пространственное повествование для концепций на ранних стадиях, социальных сетей, сайтов и презентаций клиентам.
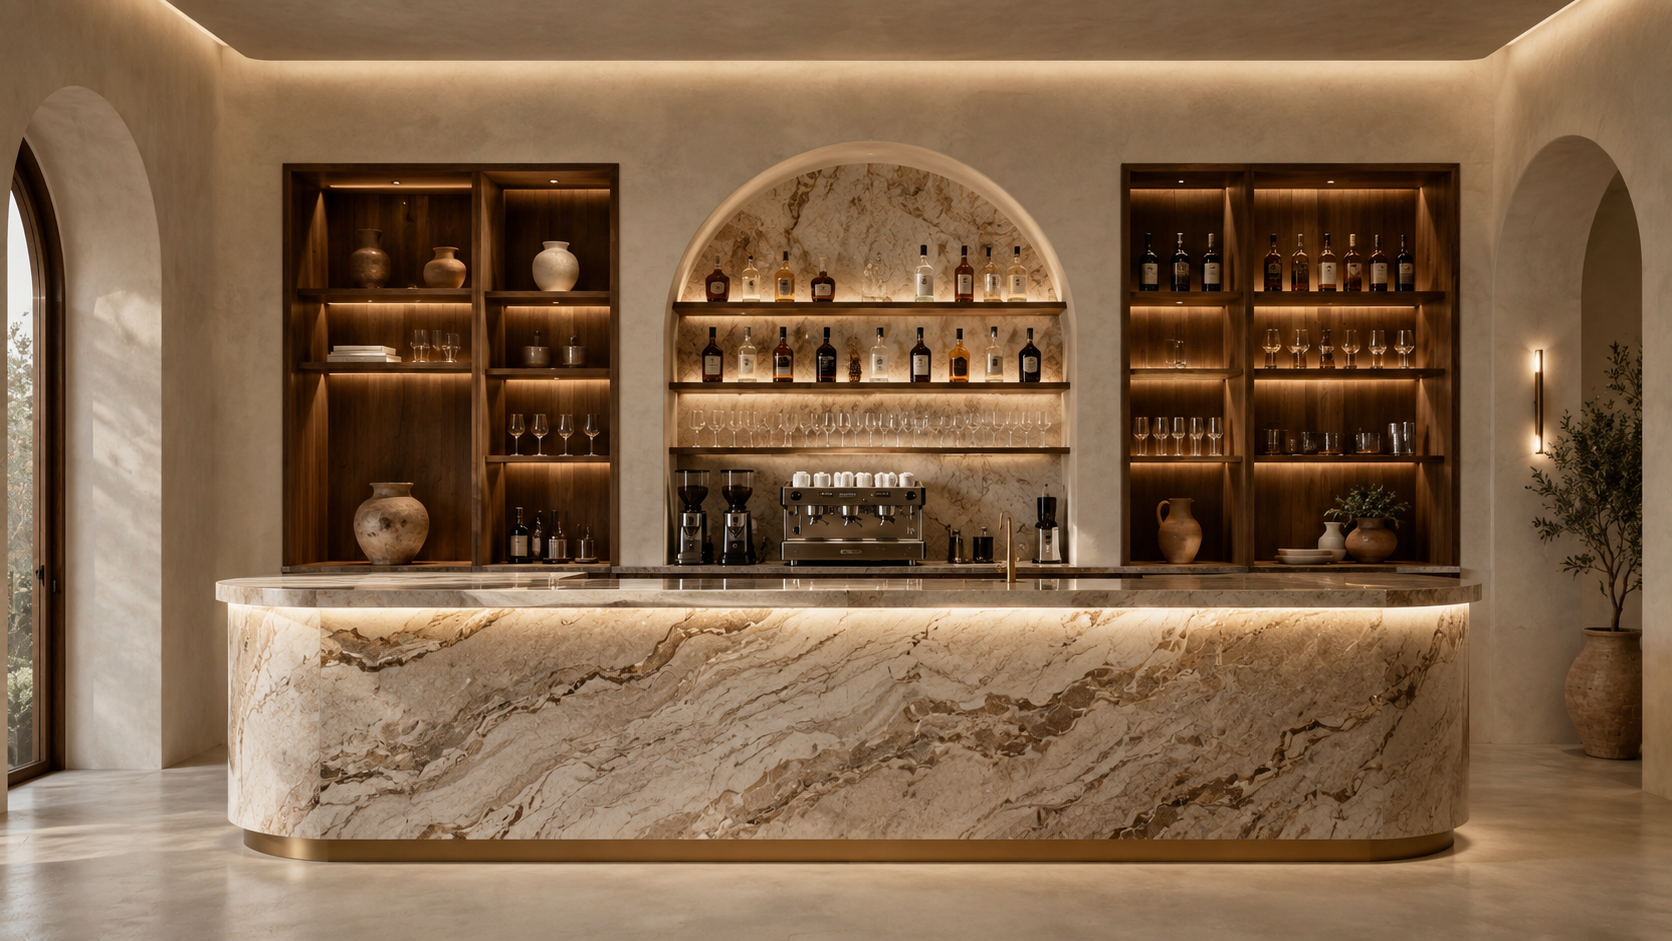 Рис. 01. Использование проработанной статичной визуализации в качестве первого кадра видео
Как показали наши тесты, ключ к успешной генерации видео заключается не просто во фразе «сделай движение». Эффективный видеопромпт должен контролировать движение камеры, перемещение людей, поведение света и общую стабильность сцены. Если хотя бы один из этих аспектов описан слишком расплывчато, результат может оказаться нестабильным — с неестественными смещениями или случайными искажениями геометрии.
Шаг 1 — Войдите в систему и подготовьте статичную визуализацию
Сначала войдите в ReRoom и подготовьте статичную визуализацию, которую вы хотите анимировать.
Исходное изображение уже должно обладать выверенной композицией, стабильно читаемыми материалами, четкими пространственными границами и выраженным визуальным центром. Качественная статичная визуализация обычно подходит лучше, чем грубый эскизный концепт, поскольку ИИ получает более стабильную отправную точку.
Прежде чем переходить к генерации видео, проверьте исходное изображение на наличие возможных проблем. Если перспектива неясна, масштаб людей изначально нарушен или на переднем плане слишком много сложных и хаотичных объектов, на видео могут появиться заметные артефакты.
Здесь действует простое соотношение: чем целостнее исходное изображение, тем стабильнее может быть видео. Однако чем сложнее сцена, тем больше деталей ИИ предстоит сохранять неизменными в процессе движения.
Шаг 2 — Откройте «Видео» и загрузите изображение
После входа в систему откройте раздел «Видео» в ReRoom и загрузите вашу статичную визуализацию.
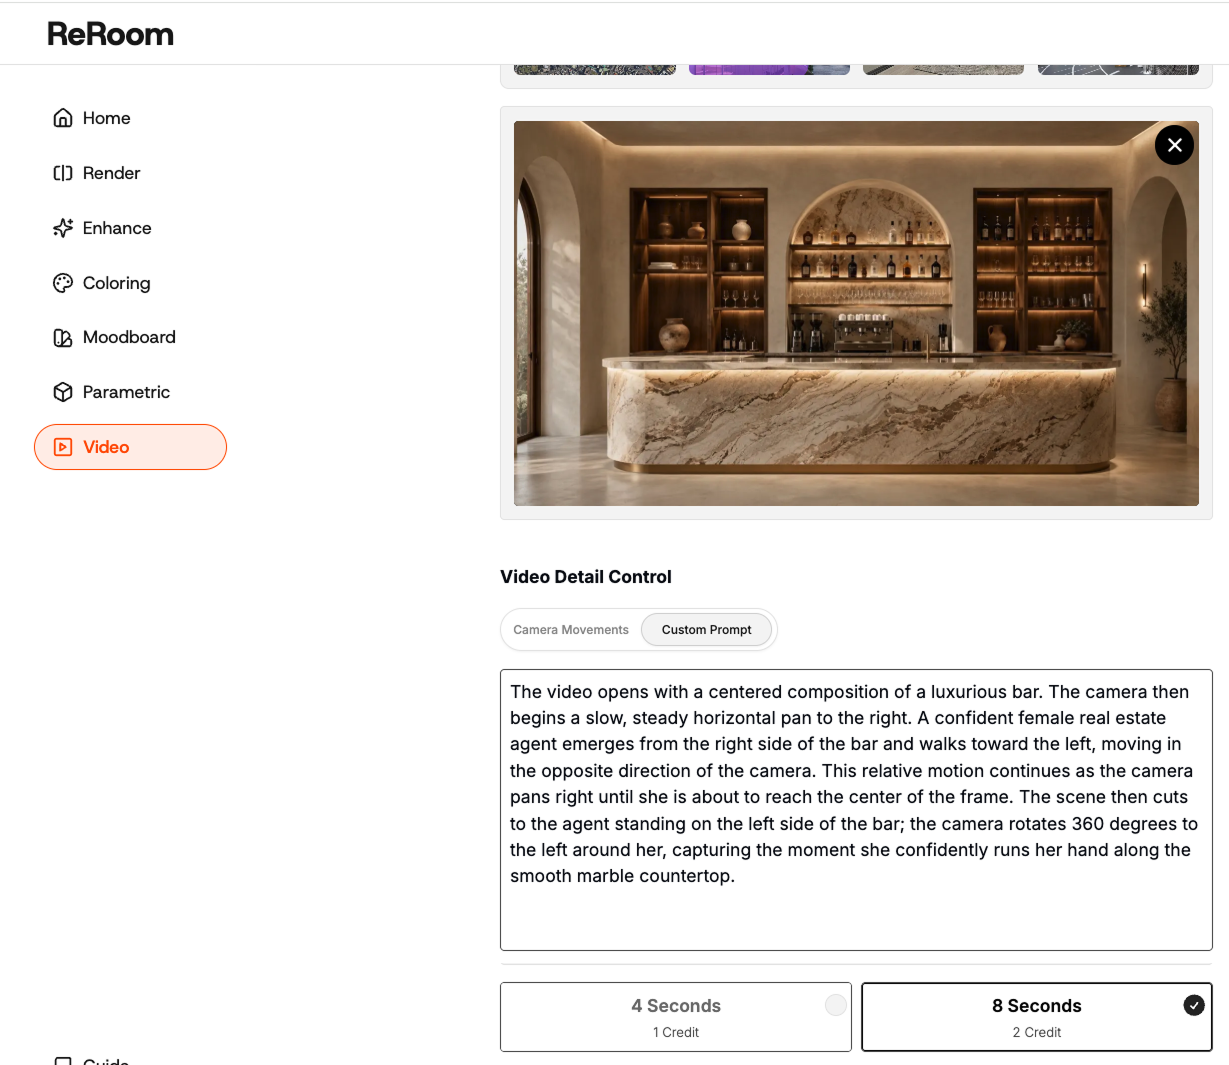
Используйте визуализацию в качестве начального кадра. Это изображение становится визуальным якорем для ИИ, поэтому сам промпт должен быть сфокусирован на том, как двигается камера, какие элементы должны оставаться неподвижными и какую атмосферу должно передавать видео.
На этом этапе избегайте внесения излишних изменений в проект. Если промпт требует одновременно новой планировки, новых материалов, другого освещения, появления людей и резкого движения камеры, видеоряд может потерять стабильность.
Первоочередная задача — заставить сцену двигаться естественно, сохранив исходную архитектуру.
Шаг 3 — Напишите промпт для движения камеры
Движение камеры — важнейшая часть видеопромпта.
Вместо того чтобы просто указывать cinematic video, мы обычно описываем траекторию более точно: tracking shot, slow pan, gentle push-in или 360-degree rotation. Эти формулировки помогают ReRoom понять, как виртуальная камера должна перемещаться в пространстве сцены.
slow cinematic tracking shot, camera gently moves forward through the interior space, stable perspective, preserve the original architecture, realistic lighting and material reflectionsДля экстерьеров плавное горизонтальное панорамирование часто работает лучше, чем агрессивное приближение. Оно позволяет зрителю детальнее рассмотреть фасад, входную группу, ландшафт и контекст улицы.
slow horizontal camera pan across the building facade, cinematic architectural walkthrough, preserve facade geometry, natural daylight, realistic street atmosphereОдна из проблем, с которой мы столкнулись, заключается в том, что формулировки с резким движением могут приводить к нестабильным результатам. Такие фразы, как fast rotation, dramatic zoom или dynamic camera movement, звучат эффектно, но в архитектурных сценах они могут вызывать растяжение пространства или искажение геометрии.
Для получения более стабильного видео мы обычно выбираем описания с плавным, медленным и размеренным движением камеры.
Шаг 4 — Добавьте людей и движение при необходимости
Как только движение камеры настроено и стабильно, можно добавить движение людей.
Присутствие людей не всегда обязательно, однако оно полезно для интерьеров, коммерческих пространств, лобби, ресторанов и объектов индустрии гостеприимства. Люди помогают передать масштаб, ритм и ощущение живого, функционирующего пространства.
a confident person slowly walks through the space, natural body movement, realistic scale, do not block the main architectural features, warm ambient lightingГлавное — сделать так, чтобы люди дополняли пространство, а не становились главным объектом видео. Мы часто добавляем указание do not block the main architectural features, чтобы человек не перекрывал ключевые элементы дизайна: лестницы, стойки, акцентные стены, входы или детали фасада.
Для сцен, где люди не требуются, промпт можно сосредоточить исключительно на движении камеры, освещении и отражениях на поверхностях материалов. Такой подход часто лучше подходит для минималистичной архитектуры или предметных интерьерных кадров.
Шаг 5 — Управляйте атмосферой, освещением и отражениями
Атмосферу сцены также можно задавать с помощью видеопромпта.
Например, если в кадре присутствуют мрамор, металл, стекло или полированное дерево, в промпте можно описать, как эти поверхности должны реагировать на свет при перемещении камеры. Это приближает видео к профессиональной архитектурной киносъемке, выводя его за рамки простой анимации картинки.
soft dusk atmosphere, warm interior glow, subtle marble countertop reflections, gentle depth of field, realistic cinematic lightingТем не менее важно не переусердствовать с атмосферными эффектами. Чрезмерное свечение (glow), густая дымка или слишком малая глубина резкости могут скрыть архитектурные детали или сделать видео искусственным.
Для архитектурных сцен мы обычно сохраняем атмосферу сдержанной, позволяя именно движению камеры раскрывать пространство.
Шаг 6 — Кадрируйте и подготовьте финальный формат видео
После завершения генерации заключительным шагом обычно является постобработка: кадрирование и приведение к нужному формату.
Для разных площадок требуются различные соотношения сторон. Для главного баннера на сайте может подойти широкоформатное видео, для Instagram Reels или TikTok может потребоваться вертикальный формат 9:16, а для постов в LinkedIn или презентационных слайдов часто лучше подходит формат 16:9.
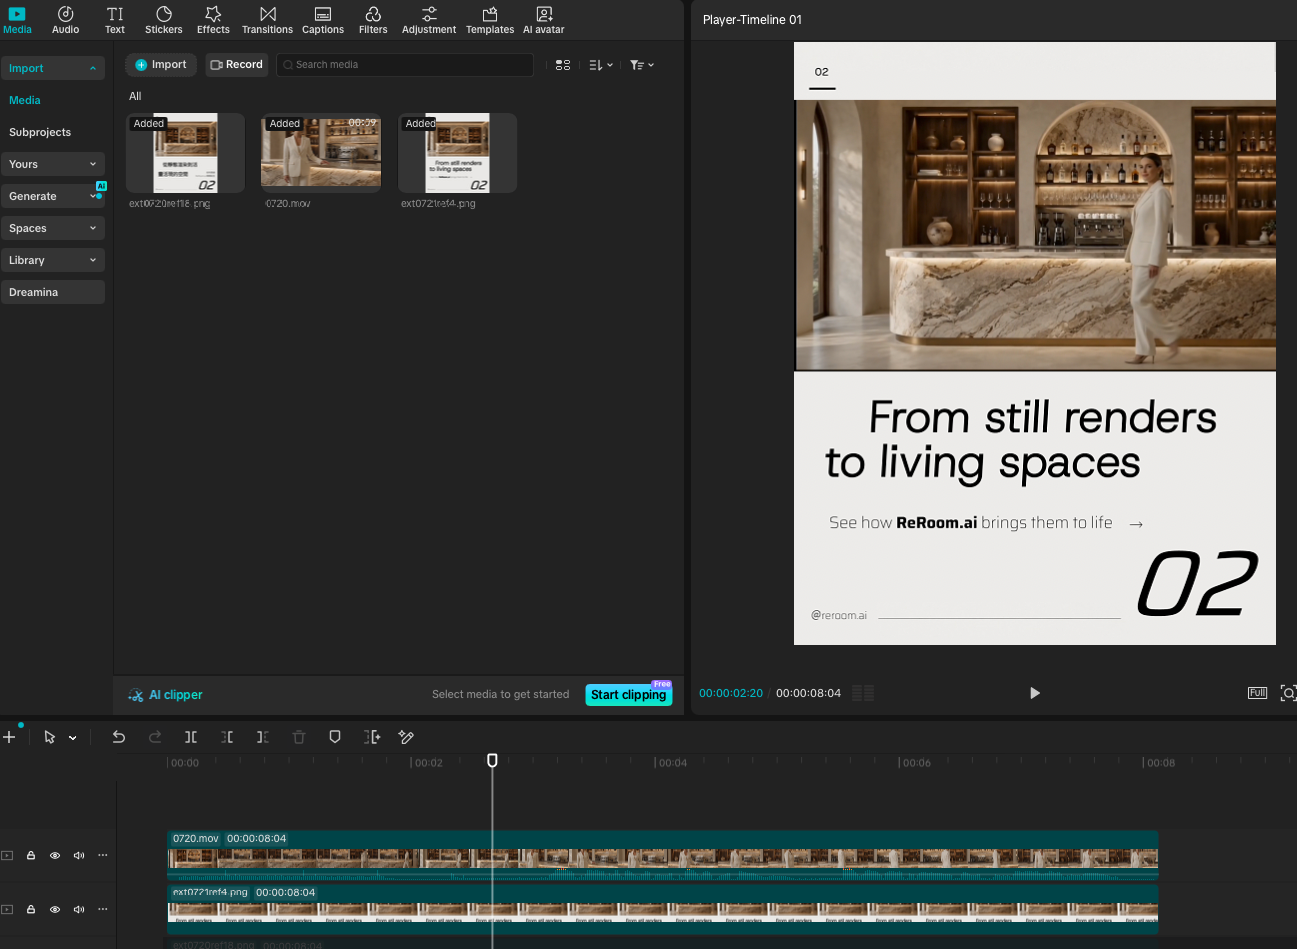 Рис. 03. Кадрирование сгенерированного видео под различные форматы публикации
Обычно мы сначала сохраняем исходное сгенерированное видео, а затем кадрируем его под каждую конкретную задачу. Это гарантирует, что ключевые архитектурные элементы, мебель или фокусные точки пространства не будут обрезаны слишком рано.
Во время этой финальной проверки мы обращаем внимание на типичные проблемы: деформацию фигур людей, резкие скачки камеры, мерцание отражений, «плывущие» края стен или нестабильную геометрию мебели. Если дефект затрагивает основу сцены, лучше вернуться назад и упростить промпт, чем пытаться исправить все с помощью кадрирования.
Что меняет этот рабочий процесс
Этот рабочий процесс превращает статичную визуализацию в иммерсивную видеопрогулку. Он полезен для вступительных кадров презентаций, видеороликов в социальных сетях, портфолио на сайте, демонстрации недвижимости и оценки атмосферы.
Мы рассматриваем ИИ-видео не как визуальный эффект, а как способ передать в статичном пространстве ощущение времени.
Результаты ReRoom по-прежнему требуют ручной проверки стабильности камеры, целостности геометрии, масштаба фигур людей и отсутствия мерцания материалов. В архитектурных и интерьерных сценах даже малейшие изменения в оконных переплетах, линиях стен или пропорциях мебели могут стать заметными, как только изображение приходит в движение.
Но на этапе эскизных концепций этот процесс помогает проектировщикам быстро передать ощущение пространства с помощью одного статичного изображения. Грамотный промпт делает больше, чем просто оживляет кадр: с помощью движения камеры, людей, света и поведения материалов он делает пространство понятным, выразительным и легким для восприятия.
Похожие публикации
Как редактировать интерьерные визуализации с помощью Nano Banana
Редактирование интерьера с помощью ИИ — это не просто улучшение картинки. Это умение контролировать, что именно изменяется, а что остается нетронутым.
Willy·30 июл. 2026 г.
Как создавать презентационные планшеты по озеленению с помощью ИИ
Презентационный планшет по озеленению — это не просто коллаж из фотографий растений. Он превращает климатические условия, расход воды и общую атмосферу в понятное проектное предложение.
Willy·24 июл. 2026 г.
Как направлять ИИ-дизайн с помощью аннотаций
Иногда рисование прямо на изображении дает более точный результат, чем составление длинного промпта.
Willy·16 июл. 2026 г.